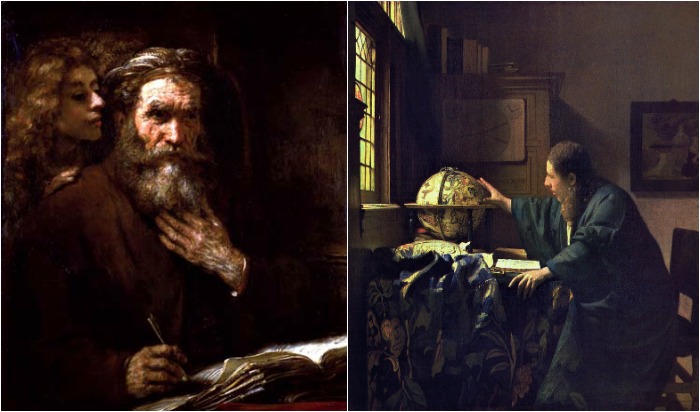
How can you tell a Rembrandt from a Vermeer? They both are from the same location and same time period, but they each have their own way of painting, and they are each categorized in art history as Northern Baroque, Rembrandt’s thick application of paint and raw emotion is easily distinguishable from Vermeer’s crisp genre paintings.
Left: Rembrant, Saint Matthew and the Angel, 1661. Right: Vermeer, The Astronomer, 1668
Putting some of their works side by side, they have many similarities but also many key differences. I love putting artworks side by side and asking students to find the differences. Teaching students how to recognize the parts of an artwork that make it unique and the choices the artist had made helps them connect with the art and trains them to see the world around them in different ways.
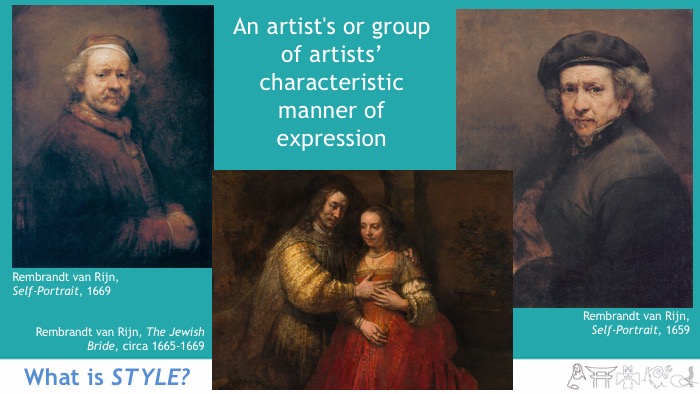
In my opinion, one of the most important strategies when learning from works of art is to focus on the style of the art. Style is an artist’s way of making art. It’s how we tell one artist or one art movement from another. It’s the way they apply the paint, the compositional choices they make, the colors they use, etc.
I always begin an art history course with a discussion on style, because it is something we come to again and again and again throughout the semester.
The way I teach style is through practice. I did this activity with my 7th graders last semester during a lesson on Post-Impression, and they ate it up! They loved it!
Here’s what I do. First, I put up 4 artworks on the screen – 3 are done by the same artist and one is done by a different artist. I pick artworks that are very similar with noticeable but not overt differences. For the first time, I ask students to write in their notes which one is not by the same artist, which one doesn’t fit. Then, they have to describe the why. What makes the fourth one different? This starts to train their eye to notice detail in art.
After they have the chance to reflect individual, we take a class vote–who thought it was A, or B, etc. Sometimes, one is a clear win, but other times there is some discussion. Whether they get it right or wrong, they are still spending time with art in valuable ways.
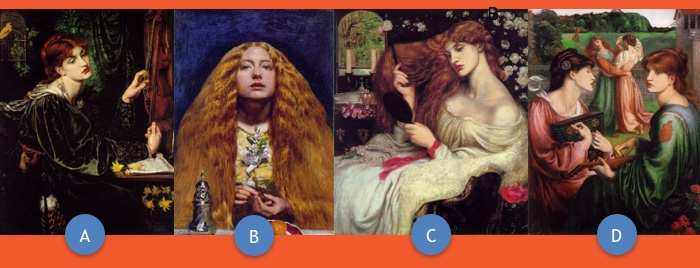
My first set I usually use is a group of pre-Raphaelite paintings. Three are done by Dante Gabriel Rossetti and the fourth is by John Millais. In this discussion, students notice the backgrounds, the textiles, the way they’re dressed, the facial features of the women, the patterns, the way the compositions are cropped, and the emotions.
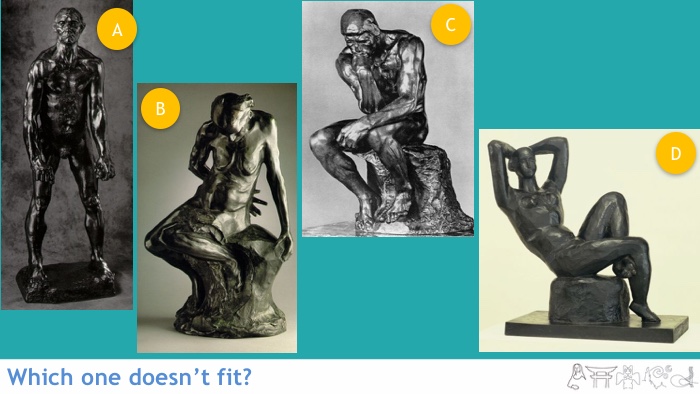
The next set is a little harder than the first–three Rodin sculptures and one sculpture from Matisse. The most obvious different is the shine of the bronze, but students must dig deeper to find the answer. The Rodin ones are more realistic with detailed body features, muscles, skin, etc. The Rodins are more emotional and more raw. The Matisse is blank, more abstract, and looks more like a sculpture than the living, breathing Rodins. (You can tell I love Rodin, can’t you?)
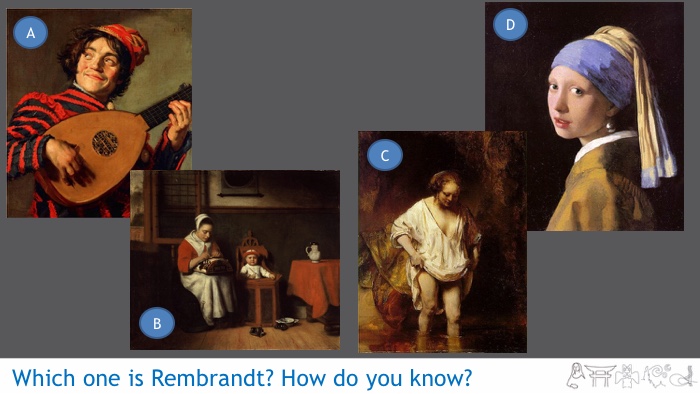
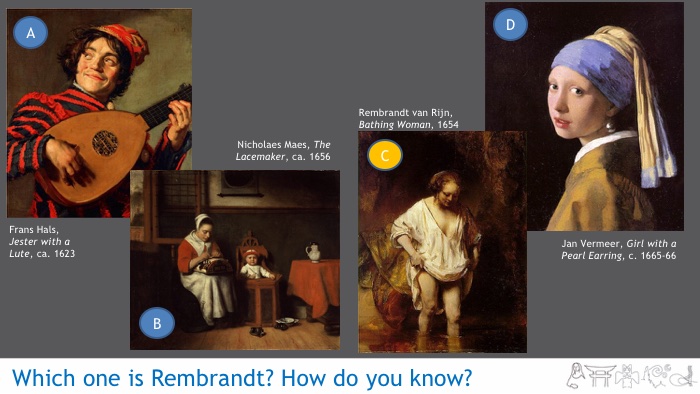
After a few rounds of picking the different artwork, I switch things up. This time, I show 3-4 artworks by one artist and ask the students to study them carefully. They right down the stylistic characteristics they notice about the artist. For this step, I usually choose Rembrandt, because he has such a distinctive style.
We look at textures from Rembrandt, how he applied the paint thickly, his use of golds, red, and browns, the simple dark backgrounds, the raw emotion. After a few minutes of study, I switch the slide and show one Rembrandt that they haven’t seen alongside three other Northern Baroque period artists. I ask, which one is Rembrandt?
Each of the other artworks on the slide are from the same time period as Rembrandt so they have commonalities like the dark backgrounds, lit figures, similar color palette, genre scenes, etc. Only one has the rich painterliness of Rembrandt. That is his style.
For a free copy of my PowerPoint for this activity, click the button below.